Posts from the ‘Healthified’ Category

Carrot Pineapple Cake Bars

Thankfully, I have my own walnut tree, which I have luckily been able to reshape into an actual tree rather than letting the local “arborists” continue to butcher it into a sad, ugly twig-like thing. For a while, it alternatively looked like an overgrown shrub with leafy English walnut branches on the top and black walnut on the bottom until I learned out to properly trim it. Two years ago, we got only six walnuts and thirteen the following year. Last autumn, I picked over five gallons worth (about two minus husks). Unfortunately due to holiday preparations and other obligations, I could not take care of all of them before they started getting buggy, so I left the unprocessed ones out for neighborhood crows. (I do not recommend this. Leaving the nuts out was a big mistake, since the crows have chased away many other birds. I sincerely hope they have not crammed walnuts between my roof shingles and buried more in the backyard. Note to self: Make time in autumn to process all of the nuts. I might have to minimize the work with a walnut shucking party.)

Double Walnut Tree

As black walnuts are readily available during the autumn harvest season and I had not worked with them before, I was feeling daring and thought I would give them a try. If you are up for a challenge, go for it, but be forewarned: black walnuts are much harder to open than their English cousins, and I recommend using a vice to avoid powdering the meat when trying to remove it from the shells. The labor and time are well-worth the tasty flavor provided by this native variety. Alternatively, you can also buy shelled chopped black walnuts at the store when they are in season. If you are lucky enough to end up with lots of nuts, you can always freeze them for later.

I made a delicious carrot pineapple poke cake as an alternative to chocolate for a friend’s recent holiday party. The original recipe was very glutenous and scrumptious, but I have included a gluten-free vegan version below. If you want frost the cake bars, please see the frosting recipe link below.

Carrot Pineapple Cake Bars

Carrot Pineapple Poke Cake Bars
Adapted from Carrot & Spice Bars in The Great American Cookie Cookbook by Publications International.

Yields 40 – 50 Bars

Ingredients
1 C Unsweetened Plain Non-Dairy Milk
1/4 C Earth Balance
1 C Oat Bran
2 T Flax or Chia Seeds, course ground
6 – 8 T Filtered Water or Pineapple Juice, room temperature
2 1/2 C Pureed Carrot
3/4 C Grated or Pureed Carrot
1/3 C Chopped Raisins
1/3 C Crushed Pineapple, optional
1 tsp Orange Zest
1 tsp Vanilla Extract
2 C Gluten-Free All Purpose or Oat Flour
2 tsp Xanthan Gum
3/4 C Evaporated Cane Juice or Sucanat
1 tsp Baking Soda
2 tsp Ground Cinnamon
1/2 C Pineapple Juice
Vegan Cream Cheese Frosting, optional
1/4 C Prepared Chopped Black or English Walnuts

Directions
In a small bowl, thoroughly beat the ground seeds into six tablespoons of the juice. Set aside for 15 to 20 minutes, stirring every five minutes to prevent clumping. If the “eggs” are too thick, stir in more juice or water, one tablespoon at a time.

Preheat oven to 350 degrees F. Grease and dust 9-inch by 13-inch glass baking dish. Set aside.

In a sauce pan over medium-low heat, simmer the non-dairy milk and spread until the spread completely melts, stirring often. Remove from heat. Stir in the oat bran and set aside for 5 minutes to absorb some of the liquid. Whisk in the “chia eggs.” Add the carrots, raisins, zest, crushed pineapple (if desired), and vanilla.

Combine the flour, gum, sugar, soda, and cinnamon in a large bowl. Add in the carrot mixture, using an electric mixer to thoroughly incorporate the ingredients. Pour the batter into the prepared baking dish, spreading it evenly with a rubber spatula.

Bake the cake for 35 minutes or until a toothpick inserted in center comes out clean and the cake edges come away from the sides of the dish. Remove from heat. Poke the cake across the top with a fork in one-inch intervals. Pour on the juice evenly over the top. Cool to room temperature on a wire rack. Frost if desired. Sprinkle on the nuts, and lightly press them into the cake. Slice the cake into bars about one by two inches big. Serve and enjoy!

This cake is very moist. Store it in a well-sealed container in the refrigerator.

Carrot Cake with Almond Flour

I love the almond flour recipe book by Elana Amsterdam! It contains so many great recipes (including almond flour pancakes) and inspiring pictures. She also wrote Paleo Cooking and Gluten-Free Cupcakes, which look equally amazing. Elana was diagnosed with celiac disease at least 10 years ago, which caused her to completely change her diet and become gluten-free.

Carrot Cake with Almond Flour Unfrosted

The other day, I happened to stumble upon her website while looking for a gluten-free carrot cake recipe for a girl friend’s birthday. I wanted to ensure there was something I could actually eat and not merely drool over from afar. The carrot cake on her website looked amazing and very similar to the spice cake in her almond flour cookbook but contains raisins rather than chopped prunes. I also really enjoy spice cake, too, by the way, so I shall have to try out this recipe later but with either her Creme Patissiere (also in her almond flour book) or the vegan cream cheese frosting I used on my red velvet cake, not the creme fraiche or the whipped cream that she recommends (I’m allergic).

Gluten-Free Carrot Cake Frosted

Gluten-Free Carrot Cake
Adapted from Elana Amsterdam’s carrot cake recipe from her website, Elana’s Pantry.
Elana topped her carrot cake with coconut cream frosting, but I topped my cake with the same cream cheese frosting that I spread on my red velvet brownies.

Yields 12 Servings

Ingredients
5 T Chia Seeds, course ground
1 C Pineapple Juice
1/2 C Warm Filtered Water
3 C Almond Meal or Blanched Almond Flour
1 tsp Himalayan Sea Salt
1 tsp Baking Soda
1 T Ground Cinnamon
1/2 tsp Ground Nutmeg
1/4 C Unsweetened Apple Sauce
2 T Grapeseed Oil
3 C Raw Carrot Puree
1 C Thompson Seedless Raisins, chopped or pureed
1 C Prepared Chopped Walnuts or Pecans, optional
Vegan Cream Cheese Frosting, optional

Directions
Mix the chia meal, juice and water together thoroughly with fork in medium bowl. Set aside for 15 so 20 minutes to allow seeds to gel, stirring every five minutes to prevent clumping.

Preheat oven to 325 degrees F. Grease and flour-dust a glass 9″ X 13″ baking dish.

With a fork, mix the flour, salt, and spices in a large bowl, breaking up any lumps.

Mix two tablespoons agave, the apple sauce, and oil into the chia “eggs.” Add in the puree, raisins, and nuts (if you are using them). Mix the wet ingredients into the dry. Add up to the last remaining two tablespoons of agave to achieve your desired level of sweetness.

Pour the batter into the baking dish. Bake the cake for 35 minutes or until a toothpick inserted into the center comes out clean. 35 minutes of baking will provide moist, bread pudding-like consistency, whereas cooking off more liquid will lend to a more cake-like confection. Cool completely on a rack away from heat. Frost the top of the cake as desired for a sweet dessert, or exclude the frosting for a delectable anytime treat. Serve and enjoy!

Super Chunky Chocolate Peanut Butter Cookies

Super Chocolate Reeses Cookies 2

Who doesn’t love chocolate and peanut butter? These cookies are perfect for satisfying your chocolate and peanut butter cravings. Thankfully the adaptation that I have included below is much healthier than the original.

At first when I tried this recipe, I made the cookies healthier by including less butter and more apple sauce, but did not take the candy coating of the peanut butter buttons into to consideration. With all of the water-based wet ingredients, it did not take long for the candy shells to dissolve and the colors to run. When I tried making the cookies again with peanut butter chunks, they turned out much better. If you do decide to peanut butter buttons, increase the amount of butter and decrease the apple sauce. If you want to boost the peanut butter flavor of the dough, replace some of the butter with peanut butter.

Super Chocolate Peanut Butter Chunk Cookies 3

Super Chunky Chocolate Peanut Butter Cookies
Adapted from Super Chocolate Cookies published in The Great American Cookie Cookbook.

Yields 18 to 20 Cookies

Ingredients
2 T Chia or Flax Seeds, course ground
6 – 8 T Warm Filtered Water
2 C Gluten-Free All-Purpose Flour
1 1/2 tsp Xanthan Gum
1/3 C Unsweetened Cacao
1 tsp Baking Soda
1/2 tsp Sea Salt
1/2 C Earth Balance, softened
1/2 C Unsweetened Apple Sauce
1 1/3 C Sucanat, ground
2 tsp Vanilla Extract
1 1/2 C Candy-Coated Peanut Butter Buttons
OR 1 1/2 C Peanut Butter Chunks or Chips
1 1/2 C Chocolate Chunks or Chips

Directions
In a small bowl with a fork, beat ground chia or flax seeds together with water. Set aside for 15 to 20 minutes to allow seeds to gel and soak up the liquid, stirring about every five minutes to avoid clumping.

Preheat oven 350 degrees F. Line cookie sheets with parchment paper or silpats.

Into a medium bowl, sift the dry ingredients, from flour to salt.

In a large bowl, cream together the spread, apple sauce, and sucanat with an electric mixer. Beat in the seed “eggs” and vanilla until thoroughly incorporated. Gradually mix the sifted ingredients into the creamed. Fold in the candy pieces.

Super Chocolate Reeses Cookies 1

Spoon cookie dough in 1/4-cup portions onto baking sheets about 3 inches apart. Slightly flatten cookies to roughly 4 inches in diameter. Bake for 13 to 15 minutes or until edges start to turn golden brown. Cool the cookies on the baking sheets for 5 minutes or until they do not buckle when lifting them with a spatula. Transfer to a wire rack and allow to cool completely or until just cool enough to eat. Enjoy!

Super Chocolate Peanut Butter Chunk Cookies 1

Kale Saag

Velvety Kale Saag

I love saag and palak dishes, especially since they are so nutritious. They are so tasty, and I love the texture and spices. Palak is made with spinach, whereas saag is made with dark winter greens in general, like kale, collards or mustard greens, which are all very rich in fiber, iron, potassium, calcium, and vitamins A and C. You can mix pretty much any kind of protein into the greens, like homemade cheese (like paneer), chicken, lamb, fish, chickpeas, lentils, tofu or nuts (like cashews). Alternatively, you can use the saag as a kind of sauce and pour it over hearty vegetables, like carrots, broccoli or cauliflower; grains , such as rice, barley or buckwheat; or grain-like seeds, like quinoa, millet or amaranth.

Winter Greens

Kale Saag
Adapted from Ambika’s Saag Paneer.
This recipe is vegan.

Yields 4 to 6 servings

Ingredients
6 – 7 C Kale with stems, trimmed
1 Medium – Large Sweet Yellow Onion, peeled, skinned
3 T Minced Garlic
1″ Ginger Root, peeled
1/4 tsp Ground Turmeric
Pinch Sea Salt
1 1/2 C Filtered Water
4 T Almond Meal
1 1/2 T Dried Fenugreek Leaves
1 tsp Smoked Spanish Hot Paprika
1 1/2 tsp Garam Masala
1 T Sambar Curry Powder
1/4 tsp Ground Nutmeg
1/4 C Carrot Greens with stems, trimmed
1/4 C Cilantro Leaves with stems, trimmed*
1 T Extra Virgin Olive Oil
2 tsp Cumin Seeds
1 T Coriander Seeds
1 1/2 tsp Fenugreek Seeds
1/2 T Grains of Paradise
16 – 24 oz Choice Protein, prepared

Kale

Directions
Chop the kale, onion and ginger in a Vitamix (high speed blender) or food processor. Set aside.

Soak the almond meal, fenugreek leaves, paprika, garam masala, curry powder, nutmeg in 1 cup of water for 15 to 20 minutes. Blend them in the Vitamix with the carrot tops and cilantro.

Toast the seeds over medium heat for 30 seconds in a dry pan, stirring constantly. At this point, I recommend grinding the seeds until fine in a spice grinder.

Saute the garlic over low heat for about a minute. Add the onions, kale, ginger, ground seeds, turmeric and salt and saute for 5 minutes over medium heat, stirring occasionally. Mix in half a cup of water. Cover and cook over low heat for 10 minutes. Add the spiced almonds, greens and herbs. Cover and stir occasionally for next 10 to 15 minutes. Stir and adjust the consistency by adding more water if necessary.

If you want a more velvety texture, puree half of the saag in the Vitamix until smooth and stir it back into the chunkier spiced greens. At this point, mix in your desired source of protein. Serve and enjoy.

Creamy Kale Saag

Optional Ingredients and Directions
You can chop a medium to large seeded heirloom yellow or orange tomato (about 1 cup) to cook with the other vegetables and fresh herbs.

To make the dish more creamy, mix 1 cup unsweetened coconut milk, almond cream or cultured coconut or almond milk (like the “yogurts” by Almond Dream, Amande or So Delicious) with the cilantro, fenugreek, almonds and spices.

*if you are using dried cilantro leaves, measure 3 tablespoons, soak them with the spiced almond-fenugreek mixture.

Kale Saag and Eggs

Gingerbread-Spiced Marshmillet Treats

I was craving rice crispy treats for a while, as well as warm spice mixes, such as clove, cinnamon and ginger. Thankfully, the local overstock grocery store was selling leftover holiday marshmallows for cheap. The marshmallows smelled amazing through the bag and were in the shape of adorable little gingerbread people. I could not resist buying them; I bought vanilla snowmen marshmallows, too. (If you want to use other marshmallows, please read my gingerbread spice-infused butter.) The overstock store, however, did not have any puffed rice, so next I stopped at Sprouts to see how much their bulk puffed brown rice was. The price was more than I expected, so I looked around for other puffed cereal options. I cannot eat puffed wheat of any variety, so those grains were right out. I was rather curious about the bags of millet, which happened to be on sale, especially since I had never eaten it before.

Gingerbread Marshmillets 02

Puffed millet cereal

Puffed Millet

The texture of millet was surprising, but I thought this cereal would work well with my desire to make gooier treats by adding extra mallows. These are not crispy. At all. Puffed millet grains are much, much softer than puffed rice. I actually added one third more marshmallows than the original recipe called for. I also halved the amount of mixed in oil, but greased my hands repeatedly to cut down on the stickiness.

Gingerbread Marshmillets
Based on the Shamrock Rice Crispy Treats recipe as a guide.

Yields: 12 to 15 Servings

Ingredients
2 8-oz bags Kraft Jet-Puffed Gingerbread Men Mallows
2 T Earth Balance Spread, plus more for greasing
6 C Puffed Millet Cereal

Directions
Line a 9 x 13-inch baking dish with either baking parchment paper. Set aside.

Grease a large glass mixing bowl with buttery spread. Pour the cereal into a large measuring cup or clean dry bowl. Set aside.

Little gingerbread flavored marshmallow people

Coated Gingerbread Marshmallow People

Melt the spread and marshmallows in a large pan or medium pot over low heat, stirring constantly to prevent the sugar from burning to the bottom. Remove the melted mallows from the heat.

Gingerbread marshmallow people melted down into goo.

Melted Gingerbread Marshmallow People

Transfer the cereal into the greased bowl. Fold the melted marshmallows into the millet. I mixed the marshmallow and millet together with my hands. If you use this method, grease up your hands first with a bit of the butter or spread to prevent the marshmallow from sticking to you so much. My hands became sticky marshmillet treats themselves as I was mixing. As the mixture cools, it will harden and become more difficult to mix, so work fast.

Mix the millet into the melted mallows.

Mix the millet into the melted mallows.

Once thoroughly combined, quickly press the mixture into the pan, spreading evenly and flattening the surface. Use a knife to cut the marshmillets into bars.

Candy-Sprinkled Gingerbread Cookies

Candy Cane-Topped Gingerbread Cookies

Gingerbread is one of my absolute types of cookies. Gingerbread cookies are perfect for the winter harvest and festival season, but sadly the winter season is over. Of course now that we are officially in spring, I am craving those warm homey spiced flavors, like gingerbread, pumpkin pie, chai and curry. At least gingersnaps, chai, and numerous curries are popular enough that they are available throughout the year. I really enjoy cooking with spices beyond salt and pepper. Spices, liven up dishes and make foods so much more interesting. As an added bonus, they also contain trace minerals, vitamins and anti-oxidants.

Spiced treats after holiday meals (and spices in your entrees) are actually quite helpful. The spices increase digestion for eating meat and other heavy foods as well as boost metabolism, which helps increase the burning of calories and body temperature, so it makes sense to me that gingerbread is a traditional winter holiday treat. In addition, ginger acts as an anti-inflammatory. I know it is strange to mention in an entry about cookies, but cinnamon regulates blood sugar, reduces LDL cholesterol levels and is anti-microbial (and therefore a natural preservative). Cinnamon also reduces arthritic and menstrual pain. Blackstrap molasses is high in iron, calcium and magnesium (with a serving size of two tablespoons dissolved in warm water) as well as significant amounts of manganese, potassium, vitamin B6, and selenium.

Gingerbread has historically been so popular, it is available in many different forms, textures and flavors from across the world. There are dry or moist cakes and hard and soft cookies, for instance, not to mention all of the other gingerbread flavored desserts. German lebkuchen are glazed flattened cookies, whereas the German Sankt Nikolaus spekulatius are very large cookies, which are made by pressing the  dough into a highly detailed design (usually St. Nick or other religious shapes) cut into a large wooden cookie presses (really a cookie board). For the Dutch and Belgian versions (speculaas and speculoos) the cookies are pressed into wooden molds of all sorts of religious  and secular shapes, even chickens and windmills. Pfeffernuesse are also German cookies but are made with peppercorns. For more gingerbread information and various cultures’ recipes, visit the St. Nicholas Center; they even have a gluten-free recipe for making speculoos. Check out Chef Petrus Hermanni Kurppa’s great collection of wooden cookie molds over on his blog, Turku Gingerbread.

Image Credit: Chef Petrus Hermanni Kurppa of Turku Gingerbread

Image Credit: Chef Petrus Hermanni Kurppa of Turku Gingerbread

Of course, you can always make crispy gingerbread cookies with a stiff dough by rolling it out thin, and then cutting the cookies into small shapes with either preformed cutters or cutting them into larger shapes by cutting the dough with a knife while following the outline drawn onto a piece of butcher or parchment paper. Making the pieces for constructing gingerbread houses (or lebkuchenhause) are also cut this way. Decorate with colorful frosting, sanding sugars and dragees to your heart’s content!

Candy Cane Gingerbread Cookies
These cookies are not specifically based on any one recipe but a couple from The Great American Cookie Cookbook.

Gluten-Free Gingerbread Cookie Dough
This cookie dough recipe is adapted from The Great American Cookie Cookbook’s Gingerbread Cookie Dough.

Yields 1 to 2 Dozen Cookies

Ingredients
1 T Chia Seeds, course ground
1/4 C Warm Filtered Water
1/4 C Unsweetened Apple Sauce or pureed pears
1/4 C Earth Balance Spread, softened
1/3 C Powdered Sucanat
1/4 C Unsulfured Blackstrap Molasses
1/2 tsp Vanilla Extract
1 1/2 C Gluten-Free All-Purpose Flour
1 tsp Xanthan Gum
1/2 tsp Baking Soda
1/4 tsp Baking Powder
1/2 tsp Sea Salt
1 tsp Ground Cinnamon
1/2 tsp Ground Ginger
Icing (see below)
Fruit Flavored Candy Canes, crushed

Directions
In a small bowl, beat the seeds and water together with a fork. Set aside for 15 to 20 minutes, stirring every five minutes or so to prevent the seeds from clumping.

Preheat oven to 350 degrees F. Line two baking sheets with silpats or parchment paper. Set aside.

In a large bowl, cream the apple sauce, spread, sucanat, molasses, “egg” and vanilla with an electric mixer until smooth.

In a medium bowl, combine the flour, gum, baking soda, baking powder, salt and spices. Add wet ingredients and mix until fully incorporated.

Spoon dough onto the baking sheets in one-tablespoon portions. Flatten slightly to spread the cookies to at least a two-inch diameter size. This dough is really sticky and difficult to work with, but try your best. Space the flattened cookies about inch apart.

Bake for eight to ten minutes or until the edges start browning. The cookies will harden as they cool, so do not worry if they are still soft. Cool the cookies for five minutes on the baking sheets. Transfer the cookies to wire racks to cool completely.

Once cool, drizzle or spoon the icing on the cookies. Immediately sprinkle the crushed candy on top and press larger pieces into the icing to ensure that it sticks. Let the icing dry for up to ten minutes.

Golden Apple Powered Sugar Icing
The Powdered Sugar Icing recipe is also from The Great American Cookie Cookbook’s.

Yields 2 1/4 Cup Icing

Ingredients
2 C Powdered Sugar
2 tsp Unfiltered Apple Juice
5 tsp Filtered Water
Yellow Food Coloring

Directions
Sift the sugar into a medium to large bowl to get rid of lumps. Mix the juice, water and sugar together with a fork.* Add more juice to increase flavor and thin the icing as necessary. Slowly stir in the yellow food coloring until you reach the medium shade of your choice.

*Increase the icing’s apple flavor by adjusting the ratio amounts of juice to water.

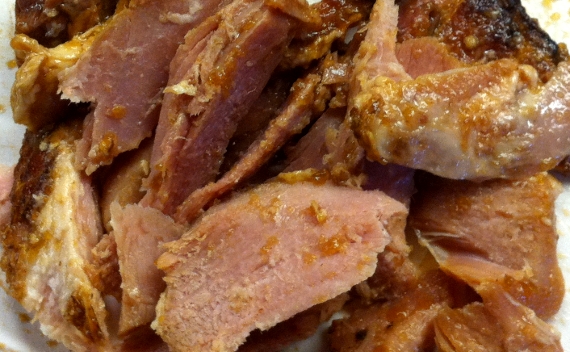
Glazed Clove-Studded Ham

Ham and String Beans

The other day at work, someone brought home-baked ham from lunch, which of course only made me crave it, so as soon as I clocked out for the day, I went to the store on a quest. A quest for ham! Well, the first store did not have what I wanted, and the second store did not either. As it was getting later though, I settled on a mostly unflavored precooked spiral-sliced hunk of ham, since that’s all the store carried. Honestly, I was too hungry to make dinner from scratch and bake the ham for several hours. I made sure to check the ingredients on the ham label first to make sure the meat did not contain any allergens or gross chemicals.

Once it was out of the packaging, I studded it with all of my whole cloves at about one-inch intervals. As per the directions, I placed the ham on a foil-lined baking sheet and then covered the ham tightly with more foil. I baked the ham at 350 degrees F for about an hour, which was about 8 minutes per pound.

During the last few minutes of the baking time, I prepared the glaze. To reduce the sugar, I opted to only use half of the sugary spiced glaze mixture, stirring it into 3 tablespoons of water in a sauce pan on low heat until the sugar crystals fully dissolved. I simmered the glaze on low for about two minutes and then brought the glaze up to a boil over medium heat, stirring frequently.

While the glaze was still hot, I removed the ham from the oven and increased the temperature to 400 degrees F. I carefully spooned the glaze onto the ham, making sure to glaze all whole cut of meat. I set the foil covering aside for post-dinner ham storage, as it was no longer needed for roasting. Once the oven reached the desired temperature, I popped the meat back in the oven to roast for another hour, when the center of the roast reached 120 degrees F. (Remember the ham was precooked, so I was just reheating it and allowing the flavors to meld.) It was nice that the ham was spiral-sliced, so all I had to do was cut the meat in sections from around the bone.

Glazed Clove-Studded Baked Ham

I was so relieved that preparing the ham was so easy. Although I wish I cooked the ham and made the glaze from scratch, this was a nice alternative. I am very glad that there was plenty of leftovers for my husband and I to incorporate into later dishes, such as soup, salad and sandwiches. Most importantly, it was rather healthy and delicious.

Red Velvet Beet Cake

This is attempt number two in efforts to create a more cake-like red velvet made with beets. The first attempt of making this cake was a failure that actually turned into tasty dark chocolate brownies. My adaption was a big success! The confection had a nice cake consistency and sweet flavor. The folks at my work greatly enjoyed it (despite that most of them are not accustomed to gluten-free or vegan specialty foods; some even asked for my recipe). Unlike the brownies, the cake batter has more fruit puree, no chocolate chunks, and less cacao powder and beet puree, so it is not as dense. I used the same frosting recipe as with the brownies.

Red Velvet Slice 01

Red Velvet Beet Cake
Adapted recipe from Jen Cafferty’s recipe on the Gluten-Free Food Examiner.

Yields 15 to 20 Servings

Ingredients
2 T Chia or Flax Seeds, course ground
6 T Warm Filtered Water
1 C Cacao Powder
1/2 C Unsweetened Apple Sauce
1 1/2 C Unsweetened Pureed Pears
2 tsp Vanilla Extract
1 – 1 1/2 C Evaporated Cane Juice or Turbinado Sugar
1 3/4 C Gluten-Free All-Purpose Flour
1 1/4 tsp Xanthan Gum
1 1/2 tsp Baking Soda
1/2 tsp Sea Salt
2 Medium Beets, scrubbed, trimmed
1 T Fresh Lemon Juice
2 oz Gel or Liquid Red Food Coloring
Vegan Cream Cheese Frosting
Red Sanding Sugar, optional*

Red Beets

Directions
Preheat oven to 400 degrees F. Scrub the beets clean with a vegetable cleaning brush under cool water. Trim off the end of the tail and the top. Foil-wrap beets and place on foil-lined baking sheet. Roast 45 minutes. Cool slightly on wire racks away from heat. Unwrap and quarter. Puree in food processor with lemon juice. Set aside.

Foil-Wrapped Beets

In a small bowl, beat chia or flax seeds and water with a fork until smooth to create “egg” substitute. Set aside for 15 to 20 minutes, stirring occasionally to prevent clumping.

Preheat oven to 350 degrees F. Grease and flour-dust a glass 9″ x 13″** baking dish. Set aside.

In a large bowl, mix cacao, apple and pear sauces and vanilla. Set aside.

Into a medium bowl, sift flour, xanthan gum, 1 cup sugar, soda and salt. With an electric mixer, gradually add in cacao-apple mixture. Blend in “eggs,” beets, and food coloring. Beat until fully incorporated. Adjust batter to desired level of sweetness with remaining sugar, mixing in a quarter cup at a time.

Red Velvet Beet Cake

Bake for at least 30 minutes (mine took 70) or until toothpick inserted in center comes out clean. Cool thoroughly on wire rack.


Frost and decorate as desired. If you are using frosting that was prepared ahead of time and chilled, let it soften at room temperature to prevent separation. Make sure to stir it well before applying it to the cake. Serve and enjoy!

Decorated Cake 01

*To include a colorful decoration without adding extra sugar, even out the cake with a long serrated knife, carefully slicing off the top and trimming the sides to make them flat and level. Crumb the cut-off potion in a food processor. Use the crumbs in lieu of sanding sugar to decorate the cake after frosting.

Red Velvet Slice 02

**If desired, bake the cake in two round cake pans. Use the frosting as the cake topping and filling.

Chocolate Chip Beet Brownies and Cream Cheese Frosting

I really enjoy red velvet cake and buy a gluten-free vegan piece whenever I find it at a store, bakery or restaurant, so I decided to treat myself for my birthday when my folks came to celebrate with me. I made my adaption from a recipe I found at the Gluten-Free Food Examiner, which looked really intriguing, but I wanted to make a healthier version. I was a bit leery of the recipe’s large amount of beets and was unsure how potent the the red color or earthy root flavor would work in this cake compared to the small amount of chocolate. The cake batter of this first attempt ended up tasting too much like beets but had a great raspberry shade. The chocolate lacked flavor intensity, but the batter was at least sweet. It needed more chocolate, so I quadrupled the amount of cacao when doubling was not enough. Unfortunately, adding this much chocolate made the batter much thicker and a very dark shade of brown. As bright red coloring faded a significant amount as while baking, it came out not looking red at all, so left out the red dye in the recipe listed below. Although the the concoction was tasty to me, they were not to everyone’s liking, as some changes to the recipe resulted in rather an intense dark chocolate flavor. (I prefer my chocolate very dark and bitter, sometimes eating dried cacao beans or 89 percent to 100 percent dark chocolate bars.)

The vegan cream cheese frosting that I made is AMAZING! It tastes and feels like REAL cream cheese frosting! It is sweet, tart, light and fluffy. It’s not healthy enough to eat by the spoonful but provides a perfect accompaniment to red velvet, various spice cakes or really in any other recipe that calls for cream cheese frosting. The original recipe called for too much sugar, and the frosting made from it appeared too sweet for my brownies. I listed the reduced powdered sugar measurement (see the recipe below), which prevented the frosting from overpowering the brownies. Feel free to experiment with other dry sweeteners, but I’m not sure how the recipe will turn our if you do. I do not recommend using liquid sweeteners, as the powdered sugar seemed to absorb some of the oils in the cream cheese and prevented the frosting from becoming too greasy.

I used Daiya’s new non-dairy plain cream cheese, which already has an incredible taste and texture by itself; it even has that classic cheesy tartness that is usually so difficult to simulate without fermentation. I first stumbled upon their cream cheese when I was perusing their non-dairy cheese selection on the Daiya website. I thought to myself, “With all of the recent progress in the foodie world with gluten-free, dairy-free and vegan foods, someone has to have a created a not only decent but good dairy-free cream cheese by now. I wonder if Daiya has one yet….” Lo’ and behold (and luckily for me), they do! I really like their other non-dairy cheeses, so I thought I might as well try it. Why not?

Roast Beet Purée
Adapted from the roasting instructions for Jessica’s red velvet cake at Desserts with Benefits.

Ingredients
2 Large Beets, scrubbed, trimmed
1 1/2 tsp Fresh Lemon Juice

Directions
Preheat the oven to 400 degrees F. Wrap the beats in aluminum foil. Place on a foil-lined lipped baking sheet due to a tendency for the beet juice to bubble over through the wrapping. Roast for an hour or until a fork easily pierces through the flesh. Cool slightly on a wire rack. Unwrap the beets. Be careful not to burn your hands. Quarter them before pureeing in a food processor or high-speed blender with the lemon juice.

Birthday Brownies

Gluten-Free Chocolate Chip Beet Brownies
Adapted recipe from Jen Cafferty’s recipe on the Gluten-Free Food Examiner.

Yields 15 to 20 Servings

Ingredients
3 T Chia or Flax Seeds, course ground
8 T Warm Filtered Water
2 C Cacao Powder
1 1/2 C Unsweetened Apple Sauce
2 tsp Vanilla Extract
1 – 2 C Evaporated Cane Juice or Turbinado Sugar
1 3/4 C Gluten-Free All-Purpose Flour
1 1/4 tsp Xanthan Gum
1 1/2 tsp Baking Soda
1/2 tsp Sea Salt
1 C Roast Beet Puree (see above)
20 oz Vegan Chocolate Chunks or Chips
Vegan Cream Cheese Frosting (see below)
Red Sanding Sugar, optional

Directions
In a small bowl, beat chia or flax seeds and water with a fork until smooth to create “egg” substitute. Set aside for 15 to 20 minutes, stirring occasionally to prevent clumping.

Preheat oven to 350 degrees F. Grease and flour-dust a glass 9″ x 13″ baking dish. Set aside.

In a large bowl, mix cacao, apple sauce and vanilla. Set aside.

Into a medium bowl, sift flour, xanthan gum, 1 cup sugar, soda and salt. With an electric mixer, gradually add in cacao-apple mixture. Blend in “eggs” and beets. Stir until fully incorporated. Adjust batter to desired level of sweetness with remaining sugar, mixing in a quarter cup at a time. Fold in chocolate pieces.

Bake for at least 30 minutes (mine took 70) or until toothpick inserted in center comes out clean. Cool thoroughly on wire rack. Frost and decorate as desired.* Serve and enjoy!

*If you do not want to frost the brownies, they would also taste great accompanied by vanilla ice cream or whipped cream.

Frosted Red Velvet Beet Cake

Vegan Cream Cheese Frosting
I adapted this cream cheese frosting made by Rachel Young of Gladly Gluten Free.
I doubled this recipe from the original, since I planned to make cakes for two different occasions.

Yields 40 to 48 Servings.

Ingredients
16 oz Daiya Plain Cream Cheese, softened
2 C Earth Balance Spread, softened
2 tsp Vanilla Extract
4 C Powdered Sugar, to taste

Directions
Combine the cream cheese and spread in a large bowl until fluffy.Thoroughly incorporate the vanilla. Sift the sugar to get rid of lumps, gradually adding four cups of sugar to the cream, using an electric mixer. Adjust the frosting to your level of desired sweetness by slowly adding up to another cup of sugar. Store leftover frosting in a large airtight container, like a glass canning jar, for up to a week; just make sure you let it soften it a bit before attempting to spread it on a cake.

Paleo Carrot Coconut Muffins

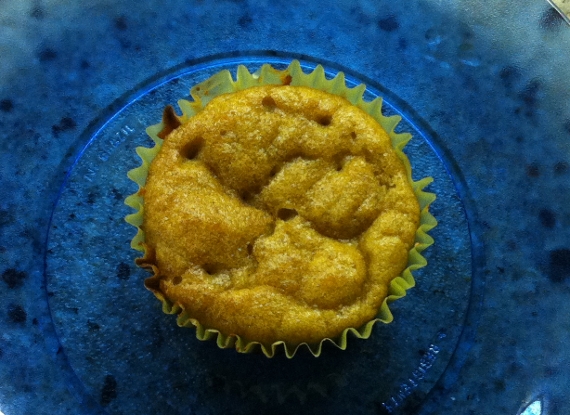
Coconut Paleo Cornbread Muffins 1

The other day while browsing Facebook, I ran across Lauren’s paleo cornbread muffins. The muffins looked really good from their description, and the title seamed rather interesting. I mean, what are cornless cornbread muffins anyway? Well, these tasty treats are actually cornbread-style coconut muffins. I know that may sound strange, but the muffins are very tasty. The flavors blended nicely, covering up any potential coconut flavor almost entirely (if you want a more pronounced coconut taste, I’m sure it’s not too hard to adjust the flavors).

Savory Coconut Muffins

These muffins looked like they would go perfectly with the chili from the recipe I recently posted, but they also taste great on their own. The muffins contain honey without being overly sweet, especially since I swapped the originally listed apple sauce with carrot puree. I was bothered by the amount of oil that the recipe called for, which was equal to the flour measurement. My stomach doesn’t usually handle oily foods very well (it just sinks to the bottom of my stomach and lingers). I halved the oil, substituting it with more carrots. If you want, you can lower the fat even more by completely substituting the oil with puree; I plan to do this next time as an experiment.

Cheesy Savory Coconut Muffins

To increase savoriness, I added Daiya pepperjack cheese to half of the muffins by sprinkling it on top, but later realized that I should have put the cheese in the middle (I did include instructions for that below) to prevent it from so firmly sticking to the liners.

What do you put in your cornbread muffins? What do you eat them with?

Coconut Paleo Cornbread Muffins 2

Carrot Coconut Muffins
Adapted from Lauren’s Paleo Cornbread Muffins at Empowered Sustenance
The recipe below is a doubled adaptation of the original version. I have also included vegan options.

Yields 1 Dozen Muffins

Ingredients
1/2 C Coconut Flour
1/4 C Coconut Oil, melted
1/4 C + 2 T Raw Pureed Carrot, room temperature
4 Eggs, room temperature
OR 4 Chia Eggs (1/4 C Chia Seeds + 3/4 C Filtered Water)*
2 T Creamed Cinnamon Honey or Wildflower Honey**
1/2 tsp Baking Soda
2 tsp Unfiltered Apple Cider Vinegar
Filtered Water, as needed, room temperature
Daiya Pepperjack Style Shreds, optional

Directions
For vegan muffins, finely grind the seeds in a spice grinder. Mix the chia egg ingredients together with a fork in a medium bowl, adding up to 4 more tablespoons of filtered water if necessary to create an even egg-like consistency. Set aside for 20 minutes, stirring occasionally.

Preheat the oven to 350 degrees F. Grease or line the muffin tin with muffin papers. Set aside.

In a large food processor, combine the flour, oil and 1/4 cup puree until well combined. Incorporate the eggs fully until the batter no longer has any lumps. Mix in the remaining puree, sweetener, baking soda and vinegar. Add more water as needed to achieve proper muffin batter thickness.

Pour about 1 tablespoon of batter into the muffin cups. Sprinkle about 1 to 2 teaspoons of cheese on top if desired. Pour another spoonful of batter over the cheese.

Bake for 30 to 40 minutes or until a toothpick inserted in the center comes out clean. Cool the muffins on a wire rack for 15 minutes. Turn out the tin onto a rack or plate. Cool until they are warm to touch and ready to eat.

Store in an airtight container. They will last longer if chilled.

*You can make flax “eggs” instead of chia ones with the same seed to water ratio and instructions.

**For lower sugar content, use 1 tablespoon blue agave nectar or about 6 to 9 drops of liquid stevia in lieu of honey.

Note: If you want to leave out the sweetener entirely, just add more carrots. You can also add minced bacon, red bell pepper, chiles or scallions.